Build APIs super-fast with Laravel
Doing my first Meetup / Webinar in over 15 years (attended plenty, but not presented at one since my days with Joomla and JHShop)... However in this session we'll be looking at boiler plating a fully functional API driven app in less than 30 minutes


Laravel is a PHP framework developed with PHP developer productivity in mind. Written and maintained by Taylor Otwell, the framework is very opinionated and strives to save developer time by favouring convention over configuration.
The framework also aims to evolve with the web and has already incorporated several new features and ideas in the web development world—such as job queues, API authentication out of the box, real-time communication, and much more.
Instead of re-inventing the wheel, I decided to leverage as much of that eco-system as possible and only adding logic to deal with the api that was not already present.
In this tutorial, we’ll explore the ways you can build—and test—a robust API using Laravel with authentication.
RESTful APIs
First, we need to understand what exactly is considered a RESTful API. REST stands for REpresentational State Transfer and is an architectural style for network communication between applications, which relies on a stateless protocol (usually HTTP) for interaction.
HTTP Verbs Represent Actions
In RESTful APIs, we use the HTTP verbs as actions, and the endpoints are the resources acted upon. We’ll be using the HTTP verbs for their semantic meaning:
GET: retrieve resource(s)
POST: create resource
PUT: update resource
DELETE: delete resource
Setting Up a Laravel Web Service Project
As with all modern PHP frameworks, we’ll need Composer to install and handle our dependencies. After you follow the download instructions (and add to your path environment variable), install Laravel using one of the methods offered in their documentation. For those of you who use Docksal - take a look at this post
Next setup your authentication - which you can do your own or follow this post
Once your Laravel instance is setup, run the following command to install the API Package:
composer require phpsa/laravel-api-controller phpsa/laravel-postmanonce that has run if you run php artisan you will see these under the make section:

Ok let us setup our first api endpoints to manage Users, roles and permissions.
We use Spaties Roles / Permissions package so the next steps would be installing it and publishing the configs:
composer require spatie/laravel-permission
php artisan vendor:publish --provider="Spatie\Permission\PermissionServiceProvider"
php artisan migrate
and add to the Users model:
<?php
namespace App\Models;

use Illuminate\Contracts\Auth\MustVerifyEmail;
use Illuminate\Database\Eloquent\Factories\HasFactory;
use Illuminate\Foundation\Auth\User as Authenticatable;
use Illuminate\Notifications\Notifiable;
use Laravel\Sanctum\HasApiTokens;
use Spatie\Permission\Traits\HasRoles;

class User extends Authenticatable implements MustVerifyEmail
{
    use HasFactory, Notifiable;
    use HasApiTokens;
    use HasRoles;
...
Now lets create our seeder.
php artisan make:seed RolesSeeder<?php
namespace Database\Seeders;
use Illuminate\Database\Seeder;
use Spatie\Permission\Models\Role;
use Spatie\Permission\Models\Permission;
class RolesSeeder extends Seeder
{
/**
* Run the database seeds.
*
* @return void
*/
public function run()
{
$permissions = [
'role-list',
'role-create',
'role-edit',
'role-delete',
'user-list',
'user-create',
'user-edit',
'user-delete'
];
foreach ($permissions as $permission) {
Permission::create(['name' => $permission]);
}
Role::create(['name' => 'User']);
$adminRole = Role::create(['name' => 'Admin']);
$permissions = Permission::pluck('id', 'id')->all();
$adminRole->syncPermissions($permissions);
}
} Another tip here is to always make sure the password is saved encrypted, removing the need to worry about it anywhere where you are setting it - DRY code. add a new trait to your codebase:
App/Models/Traits/HasPassword.php
<?php

namespace App\Models\Traits;

use Illuminate\Support\Facades\Hash;

trait HasPassword
{
    /**
     * Check if the password is already hashed
     *
     * @param string $password
     *
     * @return bool
     */
    protected function isPasswordHashed(string $password): bool
    {
        return \strlen($password) === 60 && preg_match('/^\$2[a-z]\$/', $password);
    }

    /**
     * Sets the password attribute, hashign if not hashed
     *
     * @param string $password
     *
     * @return void
     */
    public function setPasswordAttribute(string $password): void
    {
        $hash = $this->isPasswordHashed($password) ? $password : Hash::make($password);
        $this->attributes[$this->getPasswordColumn()] = $hash;
    }

    /**
     * validates the current password
     *
     * @param string $clearText
     *
     * @return bool
     */
    public function validatePassword(string $clearText): bool
    {
        return Hash::check($clearText, $this->getPasswordColumn());
    }

    public function getPasswordColumn()
    {
        return defined('static::PASSWORD_COLUMN') ? static::PASSWORD_COLUMN : 'password';
    }
}
and add this trait to your Users Model, Now anytime you set a password value on the User model, it will check and hash it if not hashed.
Next run
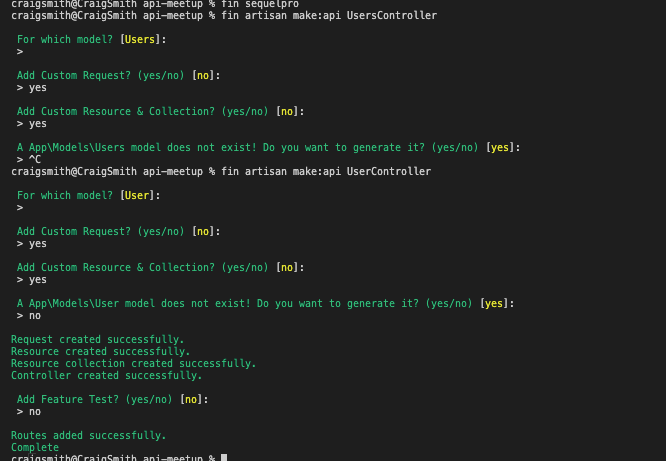
php artisan make:api UserControlleryou should get the following promps / answers
Video will be added here shortly